If you ever wanted to use an object factory that works out of the box in C++, then this article written by Francis Xavier might help you out.
http://www.gamedev.net/reference/snippets/features/supFactory/
About Me

- Angelo
- I'm a colonist who has declared war on machines and intend to conquer them some day. You'll often find me deep in the trenches fighting off bugs and ugly defects in code. When I'm not tappity-tapping at my WMD (also, known as keyboard), you'll find me chatting with friends, reading comics or playing a PC game.
Saturday, July 18, 2009

Monday, July 6, 2009
Cppcheck - An open source C++ static analysis tool
How would you identify potential flaws in your code? Conducting a code review would make sure that:
1. Possible errors/exceptions are dealt with.
2. Proper design patterns and good coding idioms have been used.
3. Common logical errors are eliminated and more...
However if bugs were introduced by a human in the first place, then those self-same bugs could be missed during a code review. Human program-comprehension is not very reliable.
Now, what if there were a tool to conduct the code review? That's what Static Code Analysis is for. It involves the analysis of program code without actually executing it. Of course, unlike a human, a tool that automates the process of static analysis can't really consider design issues on a large scale. It can offer advice about certain basic design patterns and good programming practices but it can't go beyond that and look at the big picture.
There are plenty of great static analysis tools around. You can get a complete list here. If you're a C/C++ programmer, you might want to try out Cppcheck. Its been GPL licensed and has a QT application front end for those who don't want to get their hands dirty with the command line. :)
Wiki entry on Cppcheck
SourceForge Project site of CppCheck
1. Possible errors/exceptions are dealt with.
2. Proper design patterns and good coding idioms have been used.
3. Common logical errors are eliminated and more...
However if bugs were introduced by a human in the first place, then those self-same bugs could be missed during a code review. Human program-comprehension is not very reliable.
Now, what if there were a tool to conduct the code review? That's what Static Code Analysis is for. It involves the analysis of program code without actually executing it. Of course, unlike a human, a tool that automates the process of static analysis can't really consider design issues on a large scale. It can offer advice about certain basic design patterns and good programming practices but it can't go beyond that and look at the big picture.
There are plenty of great static analysis tools around. You can get a complete list here. If you're a C/C++ programmer, you might want to try out Cppcheck. Its been GPL licensed and has a QT application front end for those who don't want to get their hands dirty with the command line. :)
Wiki entry on Cppcheck
SourceForge Project site of CppCheck
Saturday, June 27, 2009
AIMP2: A free Audio Player
AIMP2 is a free audio player. While the player appears free for now, there might possibly be a paid version in the future. The look and feel of AIMP2 lies somewhere between players like VLC (not so great looking...) and WinAmp (overkill!). I found this player to be pretty feature rich and less buggy too.
Check it out at http://www.aimp2.us

Check it out at http://www.aimp2.us
Wednesday, April 15, 2009
Customizing the items in a WinForms ComboBox
The combo box is one of the favoured means by which users can select one from a group of pre-defined options. It provides a neat interface and reduces on-screen clutter. The items in a combo box are strings by default and for most cases, string items are sufficient for presenting data to the user. For example, a list of cities like "Wayanad", "Trivandrum" and "Ernakulam". However, there may be cases where strings are not enough.
What do we have?
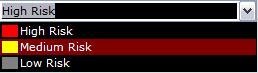
We have an application that displays a demographic map of civil conflict. Areas on this map are categorised as high, medium and low risk. High risk areas are characterized by a red colour, medium risk areas are yellow and low risk areas are grey.
Now, these legend colours need to be presented to the user (There are only three colours here but there could be more). Further more, the user might want to select an area of risk and additional data will be presented to the user based on his/her selection.
What do we need?
We need more than just a standard combo box, we need a customized combo box! Let's call this type of combo box a LegendComboBox. A LegendComboBox will display a rectangle with a colour inside it along with a string. This can be accomplished by manually drawing the items inside the combo box instead of letting it be drawn for us.

How do we get what we need?
Before we dive into creating our LegendComboBox, we need to realize the item(s) that this combo box will hold. Obviously, a simple string won't do because we also need to specify the legend colour for that string. In order to store this information, let's create a new class named LegendItem.
Now, that we know what type of items will be added to the LegendComboBox, let's create the combo box itself.
Step1: We start by deriving our LegendComboBox from System.Windows.Forms.ComboBox.
That way it looks and smells just like a regular combo box.
Step2: In the constructor of LegendComboBox we do two things.
First, we set the DrawMode of this combo box to OwnerDrawVariable. This indicates that we want to manually draw the items in the combo box. Secondly, we register a function with the DrawItem event. This function will be invoked whenever a particular item in the combo box is to be drawn on the screen.
Step3: The next step is to actually define the function that we registered with the DrawItem event of our combo box. This function will have a prototype of:
void LegendComboBox_DrawItem(object sender, DrawItemEventArgs e);
DrawItemEventArgs provides data about the item to be drawn.
This data includes the index of the item to be drawn, the graphics surface on which to do the drawing, and the area within which we can do the drawing.
That's it. We're done.
How do we use what we've got?
Using the LegendComboBox is pretty straightforward. Create an instance of this class and then add LegendItems to it.
A better solution would be to make this LegendComboBox a control that can be used in any WinForms application.
What have we learnt?
Through an example, we've seen that a WinForms combo box can be customized to display more than just string data. As a matter of fact, the DrawItem event is available for the ListBox and TabControl controls as well. Also, we aren't restricted to just drawing shapes for our items, we could even draw images and more.
What do we have?
We have an application that displays a demographic map of civil conflict. Areas on this map are categorised as high, medium and low risk. High risk areas are characterized by a red colour, medium risk areas are yellow and low risk areas are grey.
Now, these legend colours need to be presented to the user (There are only three colours here but there could be more). Further more, the user might want to select an area of risk and additional data will be presented to the user based on his/her selection.
What do we need?
We need more than just a standard combo box, we need a customized combo box! Let's call this type of combo box a LegendComboBox. A LegendComboBox will display a rectangle with a colour inside it along with a string. This can be accomplished by manually drawing the items inside the combo box instead of letting it be drawn for us.
How do we get what we need?
Before we dive into creating our LegendComboBox, we need to realize the item(s) that this combo box will hold. Obviously, a simple string won't do because we also need to specify the legend colour for that string. In order to store this information, let's create a new class named LegendItem.
//The type of item that can be added to a LegendComboBox.
public class LegendItem
{
public object Data { get; set; }
public Color Color { get; set; }
}
Now, that we know what type of items will be added to the LegendComboBox, let's create the combo box itself.
Step1: We start by deriving our LegendComboBox from System.Windows.Forms.ComboBox.
That way it looks and smells just like a regular combo box.
Step2: In the constructor of LegendComboBox we do two things.
First, we set the DrawMode of this combo box to OwnerDrawVariable. This indicates that we want to manually draw the items in the combo box. Secondly, we register a function with the DrawItem event. This function will be invoked whenever a particular item in the combo box is to be drawn on the screen.
public class LegendComboBox : System.Windows.Forms.ComboBox
{
   public LegendComboBox()
   {
    this.DrawMode = System.Windows.Forms.DrawMode.OwnerDrawVariable;
    this.DrawItem += new DrawItemEventHandler(LegendComboBox_DrawItem);
    ...
   }
}
Step3: The next step is to actually define the function that we registered with the DrawItem event of our combo box. This function will have a prototype of:
void LegendComboBox_DrawItem(object sender, DrawItemEventArgs e);
DrawItemEventArgs provides data about the item to be drawn.
This data includes the index of the item to be drawn, the graphics surface on which to do the drawing, and the area within which we can do the drawing.
void LegendComboBox_DrawItem(object sender, DrawItemEventArgs e)
{
e.DrawBackground();
LegendItem currentItem = null;
Rectangle rect = new Rectangle(2, e.Bounds.Top + 2,
                               e.Bounds.Height, e.Bounds.Height - 4);
try
{
   currentItem = (LegendItem)this.Items[e.Index];
}
catch (InvalidCastException)
{
   //If the item in the combo box is not of type LegendItem,
   //then we just draw the item without the legend colour.
   e.Graphics.DrawString(this.Items[e.Index].ToString(), this.Font,
       new SolidBrush(this.ForeColor), e.Bounds);

   return;
}

//Draw rectangle with legend colour.
e.Graphics.FillRectangle(new SolidBrush(currentItem.Color), rect);
e.Graphics.DrawString(currentItem.Data.ToString(), this.Font,
   new SolidBrush(this.ForeColor),
   new Rectangle(e.Bounds.X + rect.Width + 2,
                   e.Bounds.Y, e.Bounds.Width, e.Bounds.Height));
}
That's it. We're done.
How do we use what we've got?
Using the LegendComboBox is pretty straightforward. Create an instance of this class and then add LegendItems to it.
LegendComboBox cboLegend = new LegendComboBox();
cboLegend.Items.Add(new LegendItem { Data = "High Risk", Color = Color.Red });
cboLegend.Items.Add(new LegendItem { Data = "Medium Risk", Color = Color.Yellow });
cboLegend.Items.Add(new LegendItem { Data = "Low Risk", Color = Color.Gray });
A better solution would be to make this LegendComboBox a control that can be used in any WinForms application.
What have we learnt?
Through an example, we've seen that a WinForms combo box can be customized to display more than just string data. As a matter of fact, the DrawItem event is available for the ListBox and TabControl controls as well. Also, we aren't restricted to just drawing shapes for our items, we could even draw images and more.
Thursday, February 12, 2009
Creating an uninstall shortcut for your MSI package
Microsoft, as a general rule, expect every user to uninstall applications from the Add/Remove Programs tool in the Control Panel. However, there might be cases where one might want to add an 'Uninstall Program' shortcut to the Start->Programs Menu. The steps below are a walkthrough for creating a simple MSI package using Visual Studio 2008 and adding an 'Uninstall Program' shortcut to the Programs Menu as well.
Basic Walkthrough for creating an MSI Installation package in Visual Studio 2008.
Basic Walkthrough for creating an MSI Installation package in Visual Studio 2008.
- Open the project for which an MSI Installation package is to be added in Visual Studio 2008.
- Right click the Solution of the Project in the Solution Explorer and select Add->New Project from the context menu.
- Expand the 'Other Project Types' category and choose 'Setup Project' from the 'Setup and Deployment category'. Enter a name and location for the MSI package to be created and click OK.
- A Setup project will be added to the project solution. Right Click the Setup Project in the Solution Explorer and select View->File System from the context menu.
- Right click 'Application Folder' in the new window and select Add->Project Output. Now, select 'Primary Output' from the dialog box that pops up and click OK. A 'Primary Output from xxx' entry should appear in the Application Folder. This is the main executable of the project.
- Right click the 'Primary Output from xxx' entry and select 'Create Shortcut to Primary Output from xxx'. Repeat this step one more time to create two shortcuts.
- Cut one of the shortcuts and paste it in the User's Desktop folder. Similarly cut the other shortcut and paste it in the User's Program Menu folder. Rename each of these shortcuts to something more appropriate (such as the application name).
- Browse to the MSI project folder (using Windows Explorer), right click and select New->Shortcut from the context menu. In the Create Shortcut Wizard dialog that pops up type '%windir%\system32\msiexec.exe -x {prodCode} ' as the location of the shortcut, where prodCode is the Product Code of the MSI package. This Product Code can be identified from the Project Properties of the MSI Project in Visual Studio. Also, provide a proper name for the shortcut (such as Uninstall xxx, where xxx is the name of the application) and click Finish.
- The next step involves adding this shortcut to the User's Programs Menu folder of the MSI project in Visual Studio. The problem is that files with extension .lnk (extension of the shortcut) cannot be added to the Project. So, first we need to rename the shortcut extension from .lnk to .txt. Open up a DOS command window and browse to the location of the shortcut using the 'cd' command. Now type 'ren xxx.lnk xxx.txt' where xxx is the name of the shortcut item.
- Now, simply drag the renamed shortcut into the User's Programs Menu folder of the MSI project.
- Rename the shortcut from .txt back to .lnk.
- Build the MSI project and the necessary setup files will be created in the bin folder of the project.
Tuesday, December 23, 2008
Casting with Multiple Inheritance
(Reader Level : Intermediate)
(Knowledge assumptions : C++ casts, Multiple Inheritance)
The Question:
Given the classes:
The Answer:
pA is valid. pB is invalid.
The Reason:
Many feel that the order in which base classes are inherited does not matter for multiple inheritance. However, in some cases, it does matter. This is one of those cases.
When creating an instance of C, its A subobject will be instantiated first and then its B subobject. This behaviour is due to the fact that C inherits from A first and then from B. The 'this' pointer of the A subobject will be at an offset of 0 bytes from the 'this' pointer of objC. On the other hand, the B subobject will be at an offset of 4 bytes from the 'this' address of objC. The displacement of 4 bytes is attributed to the integer member _aValue of class A.
The following diagrams should make things clear.


Now, what happens when you cast from a void* to A*? The compiler doesn't know that the actual type of pC is C*. So, it assumes that pA can point to the 'this' address of pC. That's fair because the A subobject of an instance of C will be at the starting address of objC. However, when making the cast from void* to B*, the compiler assumes that the B subobject is at the starting address of objC. That isn't true and hence, pB is invalid.
Corollary:
Now that we know why pB is invalid, let's see if we can correct it. Obviously, reinterpret_cast is ugly and unreliable.
Would a static_cast do any better?
Unfortunately, no. A static_cast works at compile time and as stated before the compiler doesn't know anything about the actual type of pC.
How about a dynamic_cast?
A dynamic_cast would nip our futile attempts in the bud by refusing to cast from void* to anything.
The take-home message:
reinterpret_cast is bad but void* is evil!
(Knowledge assumptions : C++ casts, Multiple Inheritance)
The Question:
Given the classes:
struct A { int _aValue; };

struct B { float _bValue; };

class C : public A, public B { };
C objC;

void *pC = &objC;

A *pA = reinterpret_cast<A*>( pC );

B *pB = reinterpret_cast<B*>( pC );

...
The Answer:
pA is valid. pB is invalid.
The Reason:
Many feel that the order in which base classes are inherited does not matter for multiple inheritance. However, in some cases, it does matter. This is one of those cases.
When creating an instance of C, its A subobject will be instantiated first and then its B subobject. This behaviour is due to the fact that C inherits from A first and then from B. The 'this' pointer of the A subobject will be at an offset of 0 bytes from the 'this' pointer of objC. On the other hand, the B subobject will be at an offset of 4 bytes from the 'this' address of objC. The displacement of 4 bytes is attributed to the integer member _aValue of class A.
The following diagrams should make things clear.


Now, what happens when you cast from a void* to A*? The compiler doesn't know that the actual type of pC is C*. So, it assumes that pA can point to the 'this' address of pC. That's fair because the A subobject of an instance of C will be at the starting address of objC. However, when making the cast from void* to B*, the compiler assumes that the B subobject is at the starting address of objC. That isn't true and hence, pB is invalid.
Corollary:
Now that we know why pB is invalid, let's see if we can correct it. Obviously, reinterpret_cast is ugly and unreliable.
Would a static_cast do any better?
Unfortunately, no. A static_cast works at compile time and as stated before the compiler doesn't know anything about the actual type of pC.
How about a dynamic_cast?
A dynamic_cast would nip our futile attempts in the bud by refusing to cast from void* to anything.
The take-home message:
reinterpret_cast is bad but void* is evil!
Friday, December 5, 2008
The three aspects of a successful Software Engineer
A wise person once told me that there are three aspects to a successful software engineer.
1. Attitude.
A person must have a good outlook and should always strive to do the best that he/she can. That defines attitude. A bad attitude could be attributed to the work environment (colleagues, work interest, monetary satisfaction, bosses etc.) but a good software engineer will try not to let such annoyances affect him.
2. Motivation.
Motivation means having a reason to do things. It gives a person a purpose and goal. If the odds are stacked against a person, then he/she must rise to the occasion.
3. Ability.
Ability involves the capability of a person. The ability of a software engineer is determined by the skills in his/her domain of expertise.
Now, here’s the interesting part. The aforementioned facets of a software engineer must go in that order of precedence. By having a good attitude and an “Up and at ‘em” disposition, one can discover motivation. Once a software engineer finds a reason to do something, then he/she will not quit until the job has been done and done well. A good attitude and proper motivation will naturally make a person pay attention to trivial details. It will make him or her push forward beyond normal limits and that’s what garners ability. An individual could be born with great skill but that could be put to little use unless he/she develops a good attitude.
Laugh in the most trying of times, never give up even if the chips are down and show others respect irrespective of whether you like them or not. That’s what a healthy attitude demands.
1. Attitude.
A person must have a good outlook and should always strive to do the best that he/she can. That defines attitude. A bad attitude could be attributed to the work environment (colleagues, work interest, monetary satisfaction, bosses etc.) but a good software engineer will try not to let such annoyances affect him.
2. Motivation.
Motivation means having a reason to do things. It gives a person a purpose and goal. If the odds are stacked against a person, then he/she must rise to the occasion.
3. Ability.
Ability involves the capability of a person. The ability of a software engineer is determined by the skills in his/her domain of expertise.
Now, here’s the interesting part. The aforementioned facets of a software engineer must go in that order of precedence. By having a good attitude and an “Up and at ‘em” disposition, one can discover motivation. Once a software engineer finds a reason to do something, then he/she will not quit until the job has been done and done well. A good attitude and proper motivation will naturally make a person pay attention to trivial details. It will make him or her push forward beyond normal limits and that’s what garners ability. An individual could be born with great skill but that could be put to little use unless he/she develops a good attitude.
Laugh in the most trying of times, never give up even if the chips are down and show others respect irrespective of whether you like them or not. That’s what a healthy attitude demands.
Subscribe to:
Posts (Atom)