About Me

My photo
I'm a colonist who has declared war on machines and intend to conquer them some day. You'll often find me deep in the trenches fighting off bugs and ugly defects in code. When I'm not tappity-tapping at my WMD (also, known as keyboard), you'll find me chatting with friends, reading comics or playing a PC game.

Sunday, April 20, 2008

Movie Review: Into The Wild

Normally I'm an action junkie when it comes to movies, so its funny that 'Into the Wild' was not an action flick. The basic plot is as follows: After graduating from Emory University, top student and athlete Christopher McCandless abandons his possessions, gives his entire $24,000 savings account to charity and hitchhikes to Alaska to live in the wilderness. Along the way, Christopher encounters a series of characters that shape his life.

Seems pretty boring, right? That's what I thought when I read the plot summary on IMDB but I watched the movie anyway. It turns out that I was wrong and the movie offers some great insights into the philosophy of life and the spirituality that one can gain through adventure. This film is based on a book by Jon Krakauer who wrote about the true exploits of an American wanderer named Chris McCandless. At the end of the movie, you may become a bit cynical (as I did) due to certain developments in the plot. Then I remembered that this is an actual true story and that I was entirely missing the take home message. At any rate, whether you like or dislike this film, you are sure to have several opinions about it. To give it credit, Into the Wild won the 2007 Golden Globe Awards and was also nominated for the Academy Awards. It has also received favourable reviews from most movie critics. The acting, in my humble opinion, was top notch. Emile Hirsch (of Alpha Dog fame) plays McCandless and does a pretty good job. The film was directed by Sean Penn who was also involved in production as well as screenplay. One of the biggest assets of the film is probably its great soundtrack. The music is truly beautiful and it keeps you in touch with each scene. Don't google anything about the film until you've actually watched it. Otherwise you're just ruining the whole experience!

Some links to check out AFTER you've watched 'Into The Wild':
Wiki on Chris McCandless
Official film site
Sunday, April 13, 2008

Creating a custom GRUB bootsplash

Creating your own GRUB bootsplash image does not require you to be an artist or an image-editing wizard. It's very easy.
Every GRUB bootsplash image must have the following characteristics:
a) Image format must be of the xpm format. GRUB will load compressed images even faster.
b) Image resolution must be 640x480, irrespective of whether your monitor is widescreen or not.
c) Image can only have a maximum 14 colours. No more.

Armed with these facts, let's go ahead and try to create our own bootsplash image. The image editing software that I am going to use for this purpose is the GIMP (GNU Image Manipulation Program).
First, pick out an image that you really like. The format doesn't matter at this point. It can be jpg, bmp, png, anything you like.

Now open the image in GIMP. Resize the image to a 640x480 resolution. Go to Image->Scale Image and set Width to 640 and the Height to 480. You can tweak the other settings in the same dialog if you want. After that click on the Scale button.

Next we need to make our image only have a maximum of 14 colours. So, go to Image->Mode->Indexed. Click on the Generate optimum palette radio button and set the Maximum number of colors to 14. Now we probably have a pretty ugly looking image. :)

Finally, save the image with extension xpm. You could call it something like bootsplash.xpm. Alright, we've got our image. Let's compress it. Open up a terminal and navigate to the folder where you saved bootsplash.xpm using the cd command. Then type:

gzip bootsplash.xpm
The gzip utility will compress our image and its name gets changed to bootsplash.xpm.gz. That's it! We're done. You can now set it as your new GRUB bootsplash. Enjoy!

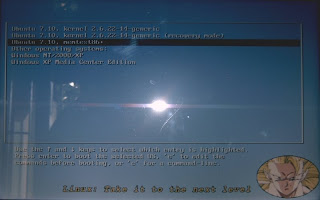
By the way, this is what my own GRUB bootsplash looks like.

Monday, April 7, 2008

Mess around with your GRUB menu

GRUB stands for GRand Unified Bootloader. I don't know why, but someone thought that it would be a funny play on the term "Grand Unification Theory" in physics. Essentially, GRUB is a bootloader program that loads when you boot into your PC. Using the GRUB menu, you can then pick your operating system of choice (if you happen to have more than one). I've been using Linux for a while now and today I'll show you how to tweak your GRUB menu settings so that it looks and behaves the way you might want it to. The Linux distribution that I currently use is Kubuntu 7.10. As such, many of the commands that I use may be Ubuntuish.

Let's get started. The options for your GRUB menu are stored in a file named menu.lst. Typically, this file will be located at /boot/grub. Before making any changes to menu.lst, let's first take a backup of the file. Open up a terminal and type the following:

sudo cp /boot/grub/menu.lst /boot/grub/menu.lst_backup

The shell should prompt you for your root password. Once you enter your password, the contents of the file menu.lst will be copied to another file named menu.lst_backup.
Now type:

sudo nano /boot/grub/menu.lst
to take a look at the menu.lst file. I'd imagine the file contents to be something like this.
Any line in this file that starts with a # symbol is a comment. This means that it will be safely ignored when GRUB reads this file.

1. Changing the default OS.
You can change the OS that loads by default in the GRUB menu. In order to do this, first count the entries in the menu starting from zero (not one). Now, locate the line in the menu.lst file that says default<space>n where n is literally a number. Change that number to the entry you want. For example, in order to make the first entry in the list as the default OS to be loaded, change the line in menu.lst to default 0
Save the file and exit the editor by pressing Ctrl+O and Ctrl+X (only for nano). A common mistake that many make is inadvertently change the commented line in the file. If there is a commented line leave it as is.

2. Changing the timeout.
Generally, the GRUB menu gives you about five seconds to decide which OS you want to boot. At the end of this time, GRUB automatically boots into the default OS. To change the timeout, simply find the line in menu.lst that says timeout and change it to timeout<space>n where n is the number of seconds you want to set. I usually set this value to 15. Save the file and exit the editor.

3. Changing the splash image.
Here's a fun customization that you can do. Most GRUB menu screens are purely black with white text. If you want to change the GRUB menu screen to that of a picture, you can easily do that. Get a nice GRUB splash image from the net. You can find plenty under the BootSplash section on http://www.kde-look.org
The grub splash image file should be something like filename.xpm.gz. If your splash image file is not in the xpm format, then it cannot be loaded by GRUB. Alright, now to set this picture as a grub splash, copy it to /boot/grub. Do the following:

sudo cp <PATH_TO_IMAGE> /boot/grub/bootsplash.xpm.gz

where PATH_TO_IMAGE is the logical path to the GRUB bootsplash image file that you intend to use. Now reopen menu.lst with root previleges.
sudo nano /boot/grub/menu.lst

Add a new line to this file (preferably after the initial comments):
splashimage /boot/grub/bootsplash.xpm.gz
Save and exit the editor.
Now everytime you boot your system, you should see the pretty new GRUB splash image instead of that boring dark one!

NOTE: If at any point, you realise that you've messed up your menu.lst file, then just retrieve it from the backup that we had first created.
Type:
sudo cp menu.lst_backup menu.lst

Tuesday, April 1, 2008

Kubuntu 7.10 CD request

I feel quite happy today because the Kubuntu Gutsy CD that I requested from Canonical has arrived. I requested for the 32-bit version of the CD on the 7th of March and today is April Fool's. So, it totally took little more than three weeks to deliver the CD. I figured that since I lived in India which is quite some distance from the US, I'd at least have to pay for the shipping charges. The truth is that I didn't have to pay a dime, no shipping charges - nothing! A friend of mine told me that he had also got some free Ubuntu stickers along with his CD request. I didn't but that's okay because now I can make my own stickers. :D

https://shipit.ubuntu.com/